Small House Minecraft: A Step-by-Step Cozy Tiny Base
Learn to design and build a compact, cozy small house in Minecraft. This guide covers footprint, materials, interior layouts, lighting, and expansion planning with practical tips for beginners to advanced players.

Take your first step toward an efficient shelter with a small house minecraft build. This guide shows how to design a compact footprint, select sturdy materials, and plan lighting, storage, and defenses. You’ll follow a clear, step-by-step process to finish a cozy, raid-ready home in tight spaces. Core requirements: basic building blocks, a flat site, and a simple interior layout.
Small-House Minecraft: Strategy and Scope
In the realm of Minecraft, a small house can be more than a starter shelter—it can be a smart, expandable base that maximizes every block of space. According to Craft Guide, the most successful tiny homes prioritize a compact footprint, accessible storage, and clean sightlines that make armory, crafting, and farming layouts feel natural rather than crowded. This section lays the groundwork for a design that stays usable as you grow your world. Think of a small house minecraft build not as a constraint, but as a launchpad for clever, modular expansion. The aim is a cozy, efficient space that still feels welcoming when you log in after a long day of mining or exploring.
- Define your core functions (sleep, storage, crafting) and keep them close to your starting point.
- Choose a footprint that fits your terrain, but leave room for future wings or mezzanines.
- Plan for lighting and safety early to reduce threats from hostile mobs at night.
Craft Guide’s approach emphasizes clarity, repeatability, and scalability. By focusing on a single, well-implemented small base, you create a reliable anchor for your Minecraft adventures.
Core Design Principles for Tiny Builds
Tiny builds succeed when you apply a handful of design rules. A small house should feel bigger than its square footage, thanks to smart layout, open sightlines, and vertical storage. The first principle is function over form: every block has a purpose, every corner stores something, and every doorway serves multiple needs. The second principle is modularity: design rooms that can be repurposed without major reconstruction. Finally, light and color balance the interior, making compact spaces feel inviting instead of cramped.
Consider these principles as your baseline:
- Use a simple rectangular footprint to minimize wall complexity and maximize interior width.
- Place essential workstations (crafting table, furnace, chest) along a single wall for quick access.
- Build a multi-purpose area that can transform from kitchen to storage to a temporary smithy with portable blocks.
Craft Guide analysis shows that thoughtful tiny-house design often yields better play flow than larger, cluttered bases. This isn’t about building a “mini shack”—it’s about creating a reliable, scalable home that grows with your adventures.
Materials & Block Choices That Save Space
Material selection drives the perceived size of a small home. Lighter blocks like wood planks and slabs can visually brighten interiors, while cobblestone and brick offer sturdiness without excessive bulk. Prioritize a cohesive palette that minimizes visual noise; a restrained color scheme makes rooms feel larger and more navigable. Glass panes for windows maximize natural light without bulking up walls, and stairs or slabs can create usable upper levels without consuming extra footprint.
- Walls: Wood planks or slabs to keep ceilings approachable and warm.
- Floors: Cobblestone or wood to balance durability with a cozy aesthetic.
- Windows: Glass panes with iron bars as decorative accents to keep a compact look.
- Roofs: A simple gable or flat roof reduces complexity while maintaining weather protection.
- Lighting: Torches, lanterns, or glowstone to ensure even illumination without clutter.
Remember to carry a basic toolbox of essential blocks so you can pivot if your terrain or resource access changes. A well-chosen material set keeps the interior bright, functional, and affordable to build.
Interior Layout: Multi-Purpose Rooms and Furniture
The heart of a small house is how you arrange space for daily tasks. The layout should minimize travel distance between sleeping, storage, and crafting stations while reserving focal points (bed, chest, crafting table) for quick access. Use vertical space for storage: shelves, stairs with chests beneath, and lofts above a compact main room. A platform bed and a compact dining/crafting area maximize floor space and keep the interior breathable.
- Entry zone: A narrow foyer with a single door and a coat/torch rack to reduce clutter.
- Main room: A bed, a workbench area, a storage wall of chests, and a small table for crafting.
- Storage strategy: Stack chests with barrels for seasonal item separation and easy sorting.
- Vertical solutions: A loft bed with ladder that doubles as a light source or bookshelf.
Functionality beats fancy decoration in tiny builds. You want a space that feels calm, not crowded, so keep paths clear and surfaces uncluttered.
Lighting, Doors, and Security in Small Builds
Lighting is the unsung hero of small bases. Adequate lighting prevents mob spawns and creates a welcoming environment. Doors should be placed for efficiency and security—one door near the main entrance, another near the storage wall, or a small back exit if you’re planning an outdoor farm. Consider glowstone or lanterns to provide warm ambient lighting without overwhelming the room. Strategic placement also reduces the need for excessive torches and keeps the interior aesthetically clean.
- Lighting layout: Even distribution to remove dark corners in every corner and under stairs.
- Door strategy: One main entry, optional interior door to isolate storage or crafting.
- Security: Place a fence around the base or use a fence gate to deter unwanted visitors.
- Ventilation: Use windows or ceiling gaps to prevent damp, gloomy vibes in tight spaces.
Small homes thrive on routine maintenance and seasonal upgrades. Regularly reassess layout to preserve flow as you add more blocks and storage.
Exterior Aesthetics: Rooflines and Facades
Exterior treatment defines first impressions. A tidy facade with consistent material choices creates a coherent look that makes a small house feel intentional rather than improvised. A modest roofline—gable or shed—keeps construction straightforward and reduces the risk of leaks in survival modes. Use simple detailing like a single eave or small balcony to add character without complicating the build.
- Choose a single roofing material for consistency and ease of build.
- Keep color and material transitions deliberate to avoid visual chaos.
- Add a small porch or overhang to frame the entrance and improve lighting near the door.
Craft Guide recommends starting simple and iterating as you gather resources. A clean exterior makes your small house a memorable anchor for longer projects.
Practical Build Plan: Notes on Scaling and Adaptation
Your first tiny home is a prototype. Plan your base in a modular way so you can expand it in layers without disturbing the core living space. A practical approach is to map a 7x9 footprint with a central living area and two wings that host storage and a workshop. Sketch a rough top-down plan, then build a dry run in a sandbox to verify function before transferring to your survival world.
- Start with a core 7x9 footprint.
- Reserve a wing for storage and farming expansions.
- Use removable walls to test configurations quickly.
- Leave safe corridors and stairs that can be relocated.
Expansion-ready design is a virtue. It saves time, reduces risk, and gives you flexibility when resources are limited.
Authoritative sources
For players seeking design and architectural insights, consult authoritative sources:
- https://www.britannica.com/topic/Minecraft
- https://extension.psu.edu/home-design
- https://www.nationalgeographic.com/science/article/designing-small-spaces
tip1NameEditNeeded?
Tools & Materials
- Wooden Planks(Use for walls, floors, and shelving. Have a few stacks ready in different shades for a varied look.)
- Cobblestone(Durable base material; good for foundation and walkway accents.)
- Glass Panes(Maximizes light without adding bulk; place where visibility matters.)
- Door (Wood or Iron)(One entry, consider a second door for back access in larger layouts.)
- Furnace(Central for smelting and cooking; place near storage wall.)
- Crafting Table(Essential workstation near core living area.)
- Bed(A compact sleeping solution; consider color for aesthetics.)
- Torches or Lanterns(Light sources to prevent mob spawns; place evenly.)
- Slabs/Ladders(Use to access lofts without consuming floor space.)
- Chests/Barrels(Storage system; use stacking and sorting for efficiency.)
- Stone/Brick Blocks(Optional bulk material for exterior accents or small roofing.)
- Scaffolding(Helpful for quick vertical builds or rooftop work.)
Steps
Estimated time: 30-60 minutes
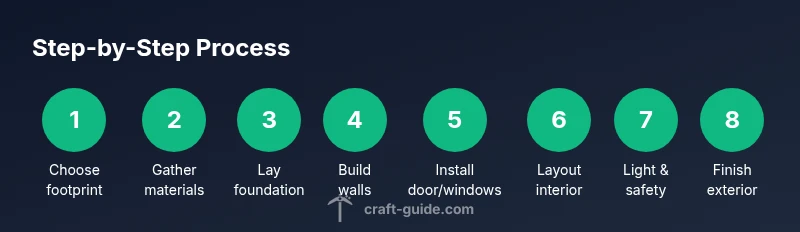
- 1
Choose footprint
Select a flat, accessible site and commit to a compact footprint, typically 7x9 blocks. Visualize rooms and flow before placing any blocks to minimize later rework.
Tip: Mark corners with temporary blocks to visualize your footprint. - 2
Gather materials
Collect essential materials in order of priority: walls/floor blocks, doors, lighting, and storage. Keep a ready stock of crafting components to avoid mid-build trips.
Tip: Create a small inventory list to stay organized. - 3
Lay foundation
Place a simple rectangular foundation and ensure it's level. Establish corner markers for walls to keep your measurements accurate.
Tip: Check compass directions to align entrances with natural light. - 4
Build walls
Raise walls to the planned height, leaving openings for doors and windows. Use consistent block types for a cohesive look.
Tip: Use slabs where possible to save interior height without losing durability. - 5
Install door and windows
Place the primary door and window openings, then install doors and glass panes. Prioritize light access and easy movement.
Tip: Avoid blocking the doorway with furniture or storage. - 6
Add interior furniture
Place bed, crafting table, furnace, and storage along a single wall to minimize travel distance. Create zones for sleeping, crafting, and sorting.
Tip: Keep frequently used items within arm’s reach of the bed. - 7
Lighting and safety
Install lighting to eliminate dark spaces and deter mobs. Verify there are no dark corners, especially around stairs or lofts.
Tip: Use a ladder or ladder-friendly design to reach upper areas safely. - 8
Exterior finishing and planning expansion
Finish the exterior with a cohesive roof and façade. Leave space for a future wing or rooftop access; plan expansion in modular steps.
Tip: Leave a clear plan for future additions to avoid structural conflicts.
People Also Ask
What is the minimum footprint for a practical small house in Minecraft?
A practical tiny base often starts around a 7x7 or 7x9 footprint, enough for a bed, storage, and essential workstations. You can adjust based on terrain and goals, but keep the layout simple to preserve movement efficiency.
A practical tiny base starts around a 7 by 7 footprint, enough for a bed and essentials; keep it simple to stay efficient.
Which materials are best for saving space in a tiny Minecraft house?
Choose cohesive materials like wood and cobblestone for walls and floors to keep weight and complexity low. Glass panes maximize light without adding bulk, and slabs can help create multi-level storage or lofts without increasing the footprint.
Wood and cobblestone walls with glass panes for light are great; slabs help you add a loft without increasing size.
How do you secure a small house against raids and monsters?
Use adequate lighting around the perimeter, place doors strategically, and consider a simple fence or wall. A loft bed with a locked storage area can also limit access to valuable items. Keep workstations grouped to reduce wandering mobs.
Light up the outer path, keep doors secure, and add a small fence; group essentials to reduce exposure.
Can I expand a tiny base later without rebuilding?
Yes. Design the core with modular wings or stacked levels that can be added later. Plan connections between rooms to avoid having to tear down existing structures.
Absolutely, you can add wings or a loft later by planning from the start.
Are there common mistakes beginners make with small houses?
Overcomplex roofs, cramped doorways, and too many stairs inside a small footprint. Start simple, test interior flow in creative mode, then transfer to survival with minimal structural changes.
Common mistakes include complicated roofs and crowded layouts; keep it simple and test the flow first.
Watch Video
The Essentials
- Plan a compact footprint with expansion in mind
- Prioritize function and modular rooms over flashy décor
- Use vertical storage and simple rooflines to save space
- Light and color balance improve perceived roominess
- Craft Guide endorses iterative, scalable tiny-house design