How to Get Shaders on Minecraft: A Practical Guide
Learn how to install shaders in Minecraft Java Edition with OptiFine, choose shader packs, and optimize performance with practical tips and troubleshooting.

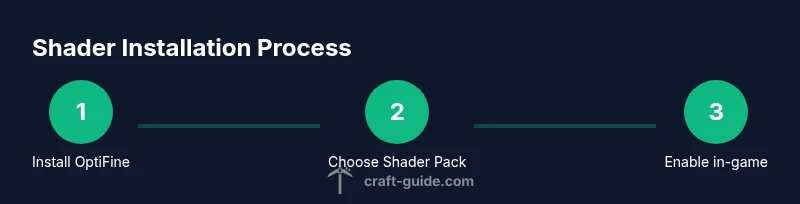
You can get shaders on Minecraft by installing OptiFine for the Java Edition, then adding a shader pack to the shaderpacks folder and selecting it in-game. This improves lighting, shadows, and reflections, while offering performance tweaks to fit your hardware. This guide covers installation, pack recommendations, and troubleshooting.
Understanding shaders and why they change Minecraft visuals
Shaders alter lighting, shadows, ambient occlusion, and water reflections, offering a cinema-like aesthetic. If you’re wondering how to get shaders on minecraft, the answer starts with OptiFine and a compatible shader pack. In practice, shaders calculate lighting in real-time and apply post-processing effects, giving you soft shadows, bloom, and color grading that vanilla Minecraft can’t achieve. The Craft Guide team notes that shaders are a visual upgrade, but they demand more from your GPU and RAM. Before you dive in, set expectations: you’ll see a notable difference, but performance will depend on your hardware and chosen shader pack. This balance between visuals and performance guides every choice you make, from shader pack selection to game settings.
For newcomers, remember that shader packs come in different quality levels and may require different versions of Minecraft and OptiFine. Start with a lighter pack to learn the basics, then gradually explore more feature-rich options if your system handles them. Craft Guide Analysis, 2026, emphasizes testing in safe environments—save a copy of your world before enabling new shaders to avoid any spoiling surprises.
Quick tip: keep your world’s graphics settings modest when testing a new shader to isolate performance variables and prevent unexpected lag during early experimentation.
Choosing the right shader pack for your setup
Choosing a shader pack is about matching your hardware, play style, and desired visuals. For players on lower-end machines, look for packs labeled as performance-friendly or “lite” versions; they retain the core lighting improvements without heavy post-processing. Mid-range PCs benefit from packs that balance features and efficiency, while high-end systems can push the envelope with feature-rich packs that maximize reflections, ambient occlusion, and volumetric lighting. Popular shader packs include Sildur’s Shaders, KUDA Shaders, and BSL, each with distinct presets that you can tailor to your preferred fidelity. When selecting a pack, verify compatibility with your Minecraft version and OptiFine version, and consider the installation footprint—some packs require additional texture packs or configurable settings files. A practical approach is to pick one pack per category (lite, balanced, and high-end) and test them across several biomes and lighting conditions to gauge relative performance. Craft Guide recommendations suggest keeping a checklist: verify availability for your current game version, evaluate performance impact, test key scenes (sunrise, dusk, water) and ensure the pack visually aligns with your build style.
Step-by-step installation workflow (overview)
This overview maps to the detailed STEP-BY-STEP section. Start by preparing your Minecraft environment, then install OptiFine, download a shader pack, place it in the correct folder, and finally enable the shader in-game. The exact path to the shaderpacks folder may vary by platform, but the standard workflow is consistent: install OptiFine, launch with OptiFine, navigate to Options > Video Settings > Shaders, click on the shader pack, and enjoy. If you opt for a larger pack with high-end lighting, you may need to reduce certain settings (like render distance) to maintain stable FPS. Remember to back up your worlds before making substantial changes, and consider testing with a less demanding shader pack first to set a baseline for performance.
Performance tuning and troubleshooting
Shader quality directly affects frame rate, stuttering, and input latency. Start by allocating sufficient memory to Minecraft via your launcher’s Java settings, then adjust shader-specific options such as shadow distance, render scale, and ambient lighting to strike a balance between visuals and performance. If you notice flickering textures or missing shadows, ensure your shader pack version is compatible with your OptiFine build and Minecraft version. Updating graphics drivers can yield meaningful FPS improvements, and reducing draw distance or turning off anti-aliasing can help on weaker hardware. The Craft Guide team notes that most issues stem from version mismatches or insufficient RAM, so a clean install with a known-good combination (Minecraft > OptiFine > Shader Pack) is a reliable starting point.
Additionally, always verify shader packs come from reputable sources. Malware-laden downloads are common in unofficial bundles, so stick to official pages or trusted communities.
Common pitfalls and safety tips
Before diving into shader installations, back up your world files and ensure you’re on a supported Java edition. Never install shader packs from unknown sources; use reputable repositories or the shader pack developer’s site. Verify your Minecraft version matches the shader pack requirements and keep a spare copy of your resource packs in case you need to revert. If you encounter crashes, revert to a previous shader version or disable the shader temporarily to confirm the issue is shader-related. Finally, keep your system drivers up to date and close unnecessary background programs to maximize available GPU memory during shader testing.
What to do after shaders are installed
With shaders installed, you’ll want to fine-tune settings to your taste and hardware. Start with lower shadow distances, reduce render scale, and test performance in diverse lighting scenarios. Save separate profiles for different worlds or biomes to quickly switch between aesthetic priorities and performance. If you’re playing with friends, confirm that your shader choices don’t create drastic disparities in server performance, especially if you’re hosting a world that others join. Craft Guide recommends keeping a notes file of your settings for future updates, so you can re-create a preferred look after game updates or shader pack changes.
Tools & Materials
- Minecraft Java Edition (latest stable release)(Ensure you’re running a compatible version for OptiFine and shader packs.)
- OptiFine for Java Edition(Download from the official OptiFine site; match the version to your Minecraft release.)
- Shader pack (.zip)(Choose a pack compatible with your OptiFine version; start with a lightweight option if you’re new.)
- Minecraft launcher(Use the launcher to manage profiles and ensure you’re launching the OptiFine-enabled instance.)
- Backup storage (optional but recommended)(Backup your worlds and resource packs before experimenting with new shaders.)
Steps
Estimated time: 30-60 minutes
- 1
Install OptiFine
Download the OptiFine jar corresponding to your Minecraft version, then run it to install a new OptiFine profile. This step integrates shader support into Minecraft and prepares the launcher for shader packs.
Tip: Confirm the OptiFine version matches your Minecraft build to avoid compatibility issues. - 2
Launch with OptiFine
Open the Minecraft launcher and start a new profile that uses OptiFine. This ensures the game runs with the shader-capable runtime.
Tip: Run a quick world load to verify the OptiFine profile is active. - 3
Download a shader pack
Choose a shader pack from a reputable source and download the ZIP file. Check the pack's version notes for compatibility with your Minecraft/OptiFine setup.
Tip: Avoid packs from unknown sources to minimize risk of malware or malware-like installers. - 4
Place the shader pack in the shaderpacks folder
Navigate to the Minecraft directory and locate the shaderpacks folder (inside the .minecraft directory). Move the downloaded ZIP file into this folder.
Tip: If the folder doesn’t exist, create it manually. - 5
Enable the shader in-game
Launch Minecraft with the OptiFine profile, go to Options > Video Settings > Shaders, and select your shader pack from the list. The changes take effect immediately in-game.
Tip: If the pack doesn’t appear, restart Minecraft or re-check the ZIP placement. - 6
Tune shader settings and test
Experiment with shader settings like shadow distance, render quality, and lighting. Test across different biomes and times of day to evaluate performance vs. visuals.
Tip: Create a baseline by first using a light preset before graduating to more demanding options.
People Also Ask
What are shaders in Minecraft and what do they add to the game?
Shaders change how lighting, shadows, and water look in Minecraft, creating a more cinematic atmosphere. They require OptiFine and a shader pack to work. The result is more realistic lighting, bloom, and color grading, but performance will vary by hardware and settings.
Shaders add cinematic lighting and reflections to Minecraft, requiring OptiFine and a shader pack; performance depends on your hardware and settings.
Do shader packs work on Bedrock Edition or only Java?
Shader packs discussed here work with Minecraft Java Edition via OptiFine. Bedrock Edition uses different graphics systems and generally relies on platform-specific packs or built-in improvements.
Shader packs described here are for Java Edition; Bedrock uses different methods.
Can I run shaders on a low-end PC?
Yes, but you should start with lighter shader packs and optimize in-game settings. Reducing render distance, shadows, and post-processing can maintain a playable frame rate while still achieving noticeable improvements.
Shaders can run on lower-end PCs by using lighter packs and balancing settings.
What’s the safest way to install shaders?
Install OptiFine from the official source, download shader packs from trusted sites, and keep backups of your worlds. Check version compatibility and avoid unverified installers.
Always use official sources and back up your worlds when installing shaders.
Do shaders affect server performance or multiplayer games?
Shaders affect your client’s rendering and can increase latency and frame times on weaker hardware. In multiplayer, performance issues are more about load and client-side rendering, so coordinate with server admins to set expectations.
Shaders can impact your client’s performance in multiplayer; keep expectations balanced with hardware.
Which shader pack is best for beginners?
Begin with a light, well-supported shader pack recommended by the community, then explore mid-range options as you gain confidence and assess hardware limits.
Start with a light shader and gradually move to more complex packs as you learn.
Watch Video
The Essentials
- Install OptiFine first, then add shader packs.
- Test with light presets before moving to high-end packs.
- Back up worlds before trying new shaders.
- Tune settings to balance visuals and performance.